
The Idea
I’ve normally draft my blog posts in OneNote and then transfer them to my blogs (m365train.co.uk, teamsqueen.com, & this one, copilotqueen.com). Whilst I have been using Copilot in a lot of areas, my blogs have always been my own work and I do not intend to change that.
However, I wanted to try an experiment using the custom instructions in Copilot Notebooks. With custom instructions you can set defaults for how you want Copilot to work for all chats within the Notebook. My experiment was to see how close I could get to the normal style and tone of my blogs, especially on the shorter, simple update sharing style blogs, such as one I want to write today about a new feature in Outlook starting to roll out.
Before, I go into detail about the steps and share the content created, a quick spoiler. I’ll still be writing my blogs myself. The experiment showed me that it is possible to achieve good results, but I believe the value in blogs like mine is that the content is human generate and I want mine to be authentically me.
What are Copilot Notebooks
Copilot Notebooks was introduced into Microsoft 365 Copilot in May 2025 and give you a Copilot Chat workspace that goes beyond a single conversation. It give you the ability to collect together relevant content, related Copilot Chats and custom instructions. The Copilot Chats you have in the Notebook are focussed on the information in content within the Notebook but can also look beyond to other files and the web. Combine this with the ability to set custom instructions as to how you want Copilot Chat within the Notebook to behave and they promise to be a very powerful tool.
The Result
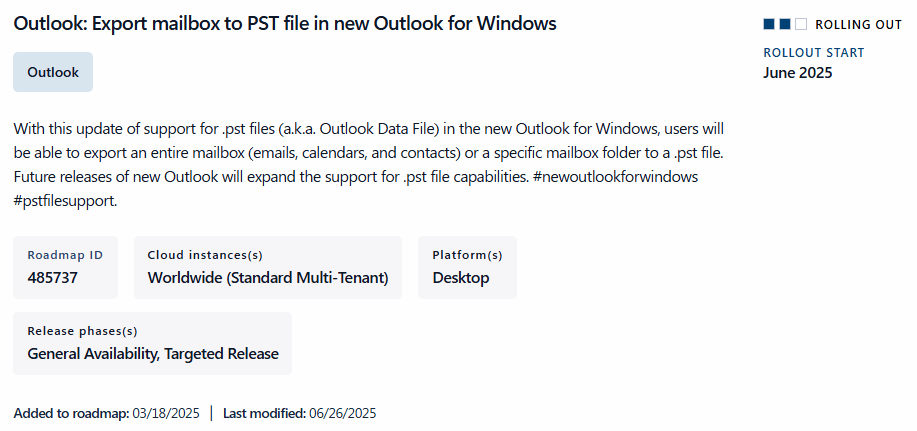
I used my Copilot Notebook to write a blog for about this Roadmap update, which showed the feature to enable export to PST in New Outlook was rolling out. The blog post is here
The style was quite good, but the content was not really what I wanted. However as part of this experiment I wanted to publish it anyway, so added some more accurate steps at the end, a disclaimer at the top and relevant images to the article.
The Process
Step 1 : Create the Notebook
Navigate to Copilot Notebooks from the Microsoft 365 Copilot navigation pane, or use the link https://m365.cloud.microsoft/notebooks
If this is your first Notebook, click Create Copilot Notebook link in the page. If you already have one or more Notebooks click the New Notebook link at the top of the list of Notebooks.
Give the Notebook a name and pull in any files you want to use as information sources (up to 20). In this case I chose not to add any files as the content of previous blog posts was not relevant for the function of the Notebook.

Step 2: Create Your Custom Instructions
If you have know the language and writing style you want then you can draft your custom instructions manually. However I wanted to match in with the existing styles on my blog and so used Copilot Chat within the Notebook to help me analyse my style and write the instructions based on that analysis. I used the following prompt:
Please describe the writing style of the following blogs. These are all my blogs and cover different topics and levels. I would like to identify a common style and then anything specific to articles for end users, poweruser and admins plus any differences in style with the non-tech content. The aim is to write custom instructions for a blog authoring agent that will write technical and non technical blog entries, with the technical blogs being targeted at one or more of the three audiences. https://m365train.co.uk/, https://teamsqueen.com/ https://copilotqueen.com/
I then had Copilot convert them into a format for the Copilot Notebook and simply pasted the result into the custom instructions dialog box which you access from the Add Copilot instructions link under the Notebook title. Once you’ve added the instructions you can edit them using the same link, which now reads Edit Copilot instructions rahter than Add. Be sure to Save your changes.

Step 3: Verify the Topic
I do not like to publish a blog until I have had a change to try out the feature so I always check to ensure I can see the feature. As the option to export was available, having run through an export I asked Copilot to write the blog.

The prompt I used was:
Based on this feature https://www.microsoft.com/en-us/microsoft-365/roadmap?filters=&searchterms=485737 now rolling out, please draft a blog about how to export mailbox to pst using new outlook on windows

